
How to copy data between s3 buckets
Overview Transferring data between Amazon S3 buckets is a common requirement for many AWS users. This guide will walk …


There are multiple ways to replicate data from an Amazon RDS instance to your preferred analytics platform. An ideal replication solution should automatically adapt to upstream changes—whether it’s adding new columns, changing data types, or updating schemas—without requiring manual code or configuration adjustments each time.
Enterprise-grade products like Oracle GoldenGate or Qlik Replicate are best suited for larger organizations and teams that need robust, high-scale solutions. On the other hand, some teams resort to building custom Python scripts for data replication. While this approach works, it often feels like reinventing the wheel. It requires developers to constantly monitor upstream changes and react accordingly—unless you build a flexible framework to manage this, which can be an extensive effort to recreate what’s already available.
Legacy ETL tools like SSIS, DataStage, Bhoomi, and Talend can also be viable options for data replication due to the robust connectors they offer. These tools have been around for years and are often part of a company’s existing infrastructure, making them familiar and reliable for data integration tasks.
Another common approach is using SaaS platforms like FiveTran, Striim, Hevo, Estuary or Stitch. These solutions simplify replication, but some charge based on the number of rows processed, which isn’t always cost-effective for databases with high transaction volumes.
In this blog, we’ll explore alternative options, including Kafka Connect if you’re already utilizing Kafka, AWS Database Migration Service (DMS) for a native AWS solution, and Slingdata.io, a no-code/low-code platform for seamless data replication.
The code used in this article can be found here.
Before we get started, make sure you have the following setups ready:
Docker: Essential for creating an isolated environment that’s consistent across all platforms. If you haven’t installed Docker yet, please follow the official installation instructions.
Terraform: We will be creating the required AWS resources using Terraform. It’s beneficial to have a basic understanding of Terraform’s concepts and syntax to follow the deployment process effectively.
AWS Account: You’ll need an AWS account to access cloud services used in this demo. If you don’t have one, you can create it by following these steps to create and activate an AWS account. AWS provides a Free Tier for new users that we’ll leverage for this demo.
Shadowtraffic: We will use Shadowtraffic to generate synthetic traffic data for testing. You’ll need an account and access to your Shadowtraffic credentials. If you don’t have one, you can sign up by following the Shadowtraffic setup guide.
Snowflake Account: You’ll need a Snowflake account to sync the data to Snowflake. If you don’t have one, follow these steps to create and configure a Snowflake account.
Ensure these prerequisites are in place to smoothly proceed with the upcoming sections of our guide.
To use Terraform with AWS, you’ll need to set up a dedicated IAM user with the necessary permissions. This ensures Terraform has secure access to manage resources in your AWS environment. Follow these steps to create the user and generate the access keys required for authentication.
Create a New IAM User:
terraform. This user will be utilized by Terraform to provision AWS resources.Set Permissions:
AdministratorAccess policy to the user.Attaching AdministratorAccess provides full access to AWS services and resources, which is recommended only for this demonstration. In production environments, it’s crucial to adhere to the principle of least privilege by assigning only the necessary permissions.
Create Access Keys:
Security credentials tab of the IAM user.This step should be done in both source and target account. Ensure you securely store the access key and secret key generated during this process, as they will be required for configuring the AWS CLI and Terraform.
For the purpose of the demo we will use a docker container called developer-tools which has Terraform and tools required for the demo. If you already have a machine with Terraform, AWS CLI then you can skip this step.
git clone https://github.com/entechlog/developer-tools.git
cd into developer-tools directory and create a copy of .env.template as .env. For the purpose of demo, we don’t have to edit any variables
cd developer-tools
Start the container
docker-compose -f docker-compose-reg.yml up -d --build
Validate the containers by running
docker ps
SSH into the container
docker exec -it developer-tools /bin/bash
Validate terraform version by running below command
terraform --version
Create AWS profile named dev by running the below command
aws configure --profile dev
Update the account details with values from Terraform User Setup in AWS
Test the profile by running the command
aws sts get-caller-identity --profile dev
To allow the connector to sink data to Snowflake, you must first generate a key pair for secure authentication. Snowflake requires a 2048-bit (minimum) RSA key. The public key will be added to a Snowflake user account, while the private key will be used in the connector configuration. Follow these steps on the machine where the connector will be executed.
Generate a private key using OpenSSL
openssl genrsa -out snowflake_key.pem 2048
Generate the public key referencing the private key
openssl rsa -in snowflake_key.pem -pubout -out snowflake_key.pub
Extract the required part of the public key
grep -v "BEGIN PUBLIC" snowflake_key.pub | grep -v "END PUBLIC" | tr -d '\r\n'
Extract the required part of the private key
grep -v "BEGIN RSA PRIVATE KEY" snowflake_key.pem | grep -v "END RSA PRIVATE KEY" | tr -d '\r\n'
Follow these steps to create the required Snowflake resources, including a user, role, database, and schema, and grant appropriate privileges.
Switch to the SECURITYADMIN role (to create roles and users)
USE ROLE SECURITYADMIN;
Create the role DEV_SVC_ENTECHLOG_SNOW_KAFKA_ROLE
CREATE ROLE DEV_SVC_ENTECHLOG_SNOW_KAFKA_ROLE;
Create the user dev_svc_entechlog_snow_kafka_user and associate the public RSA key for authentication
CREATE USER dev_svc_entechlog_snow_kafka_user
RSA_PUBLIC_KEY='<your-public-key>';
Grant the role to the user
GRANT ROLE DEV_SVC_ENTECHLOG_SNOW_KAFKA_ROLE TO USER dev_svc_entechlog_snow_kafka_user;
Create the database DEV_ENTECHLOG_RAW_DB and schema DATAGEN
CREATE DATABASE DEV_ENTECHLOG_RAW_DB;
CREATE SCHEMA DEV_ENTECHLOG_RAW_DB.DATAGEN;
Grant usage privileges to the role for the database and schema
GRANT USAGE ON DATABASE DEV_ENTECHLOG_RAW_DB TO ROLE DEV_SVC_ENTECHLOG_SNOW_KAFKA_ROLE;
GRANT USAGE ON SCHEMA DEV_ENTECHLOG_RAW_DB.DATAGEN TO ROLE DEV_SVC_ENTECHLOG_SNOW_KAFKA_ROLE;
Grant the role the necessary privileges to manage tables within the schema (for reading and writing data)
GRANT SELECT, INSERT, UPDATE, DELETE ON ALL TABLES IN SCHEMA DEV_ENTECHLOG_RAW_DB.DATAGEN TO ROLE DEV_SVC_ENTECHLOG_SNOW_KAFKA_ROLE;
This script sets up everything you need for creating a Snowflake user, role, database, schema, and configuring the necessary permissions. Feel free to modify the permissions or adjust the setup based on your specific requirements.
Let’s start by creating the MySQL database needed for replication. Follow these steps to set up the necessary infrastructure.
First, clone the following GitHub repository to get started: https://github.com/entechlog/aws-examples.git
Please run the following steps from the developer-tools container with Terraform, or from your Terraform environment.
Once cloned, navigate to the specific directory for AWS DMS Terraform configuration:
cd aws-examples/aws-dms/terraform
Create a copy of the terraform.tfvars.template file. Open the terraform.tfvars file and update it with the required values.
cp terraform.tfvars.template terraform.tfvars
Run the following command to apply the Terraform configuration and create the necessary resources:
terraform apply
This Terraform script sets up an Amazon RDS instance with binlog_format set to ROW (which is required for replication). It also creates an IAM role for AWS DMS, an S3 bucket, and assigns the necessary permissions for the IAM role to write data to S3.
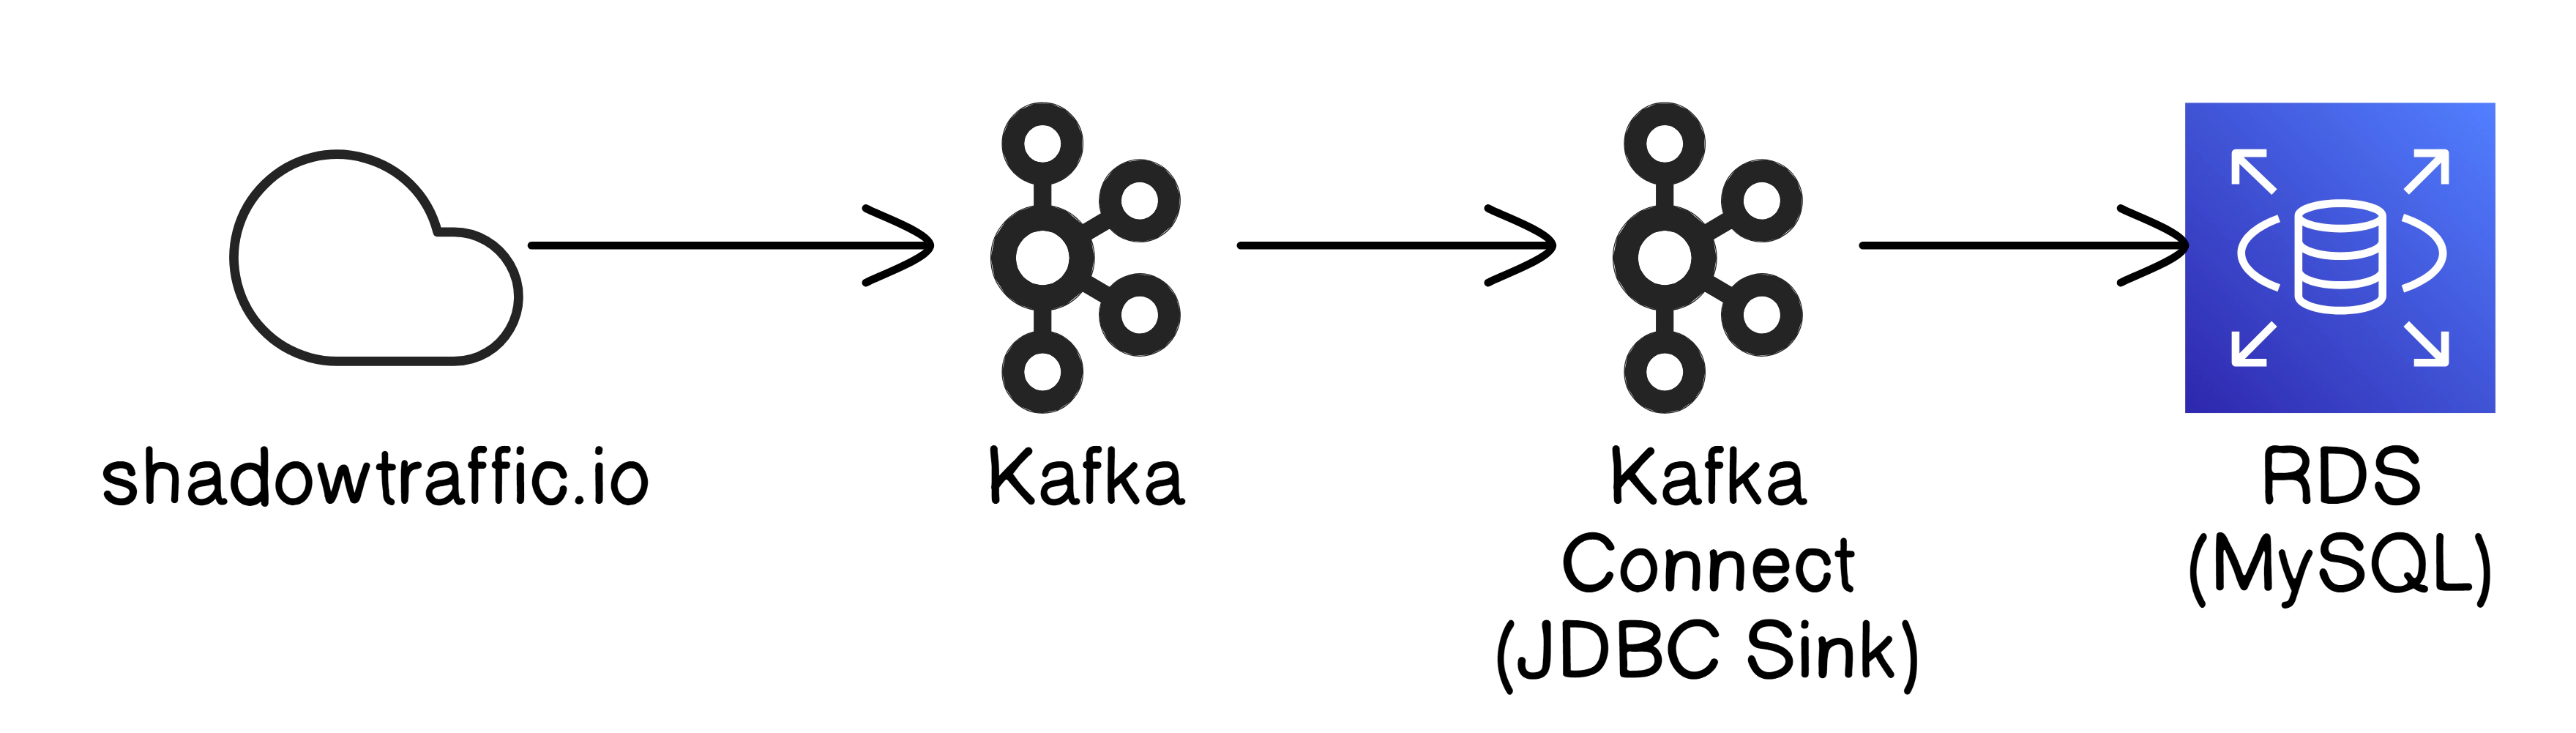
In this section, we’ll generate sample data using Shadowtraffic and Kafka. Shadowtraffic helps simulate real-world traffic data, while Kafka serves as the platform for managing data pipelines. The generated test data will be loaded into MySQL, allowing us to replicate real-world scenarios in our replication process.
You can skip this step if you already have a real-world database or other means to generate the required test data.
Navigate to the Shadowtraffic config directory, create a copy of the license.env.template file as license.env, and open the newly created license.env file to update it with your Shadowtraffic account details (you can find the required details for the license file in the welcome email from Shadowtraffic)
cd aws-examples/aws-dms/kafka/shadowtraffic/config
cp license.env.template license.env
You can find the Shadowtraffic configuration files here aws-examples/aws-dms/kafka/shadowtraffic/config and adjust them based on your test data needs. In addition to the data generated by Shadowtraffic, this demo also uses Kafka Connect’s datagen to generate a couple of test topics.
The datagen source connector configuration and the sink connector that transfers data into the MySQL database are located in the respective source and sink directories of aws-examples/aws-dms/kafka/connect/config. Additionally, there is a mysql-secrets.properties.template file in secrets directory; create a copy of this file as mysql-secrets.properties and update it with your MySQL server details.
Navigate to the Kafka directory and run the following command to start Kafka, Kafka Connect, and Shadowtraffic. This will spin up the Kafka cluster, Kafka Connect, and Shadowtraffic, which generates the test data.
Docker commands can be executed from the command line on your machine, with Docker is installed.
cd aws-examples/aws-dms/kafka
docker-compose up --build -d
Navigate to http://localhost:9021/ to open Confluent Control Center, where you can check the health of the Kafka cluster, review messages in the topics, and monitor the status of the connectors.

You can also use the following endpoints to review installed plugins, connectors, and their statuses
Download a tool like DbVisualizer, DBeaver, or MySQL Workbench (or any tool that supports MySQL), and connect to the RDS instance to verify that the required test data has been successfully loaded into the MySQL database.
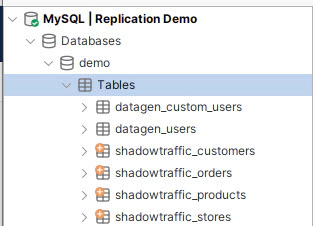
By following these steps, you’ll have a fully functioning Kafka cluster along with Kafka Connect and Shadowtraffic generating sample data. The test data created by Shadowtraffic and datagen connector is automatically loaded into your MySQL database, providing a robust environment to test and replicate your data processes.
For near real-time dashboard or analytical use cases, using RDS read replicas is one option. However, this keeps your analytical data separate from the rest of your data warehouse, which likely includes other critical data needed for real-time dashboards. A more efficient approach is to replicate data from MySQL to Snowflake in real time, leveraging a Lambda architecture to serve the final model required for real-time analytics.
To achieve this, we’ll use the Debezium SQL connector, which tracks changes in the MySQL database and streams them into Kafka. Once the data is in Kafka, we’ll use a second connector to sync it with Snowflake. Direct replication to Snowflake offers low-latency data availability, and if needed, you can also sink the data in parallel to S3 or use S3 with Snowpipe for scenarios that can tolerate a few minutes of latency.
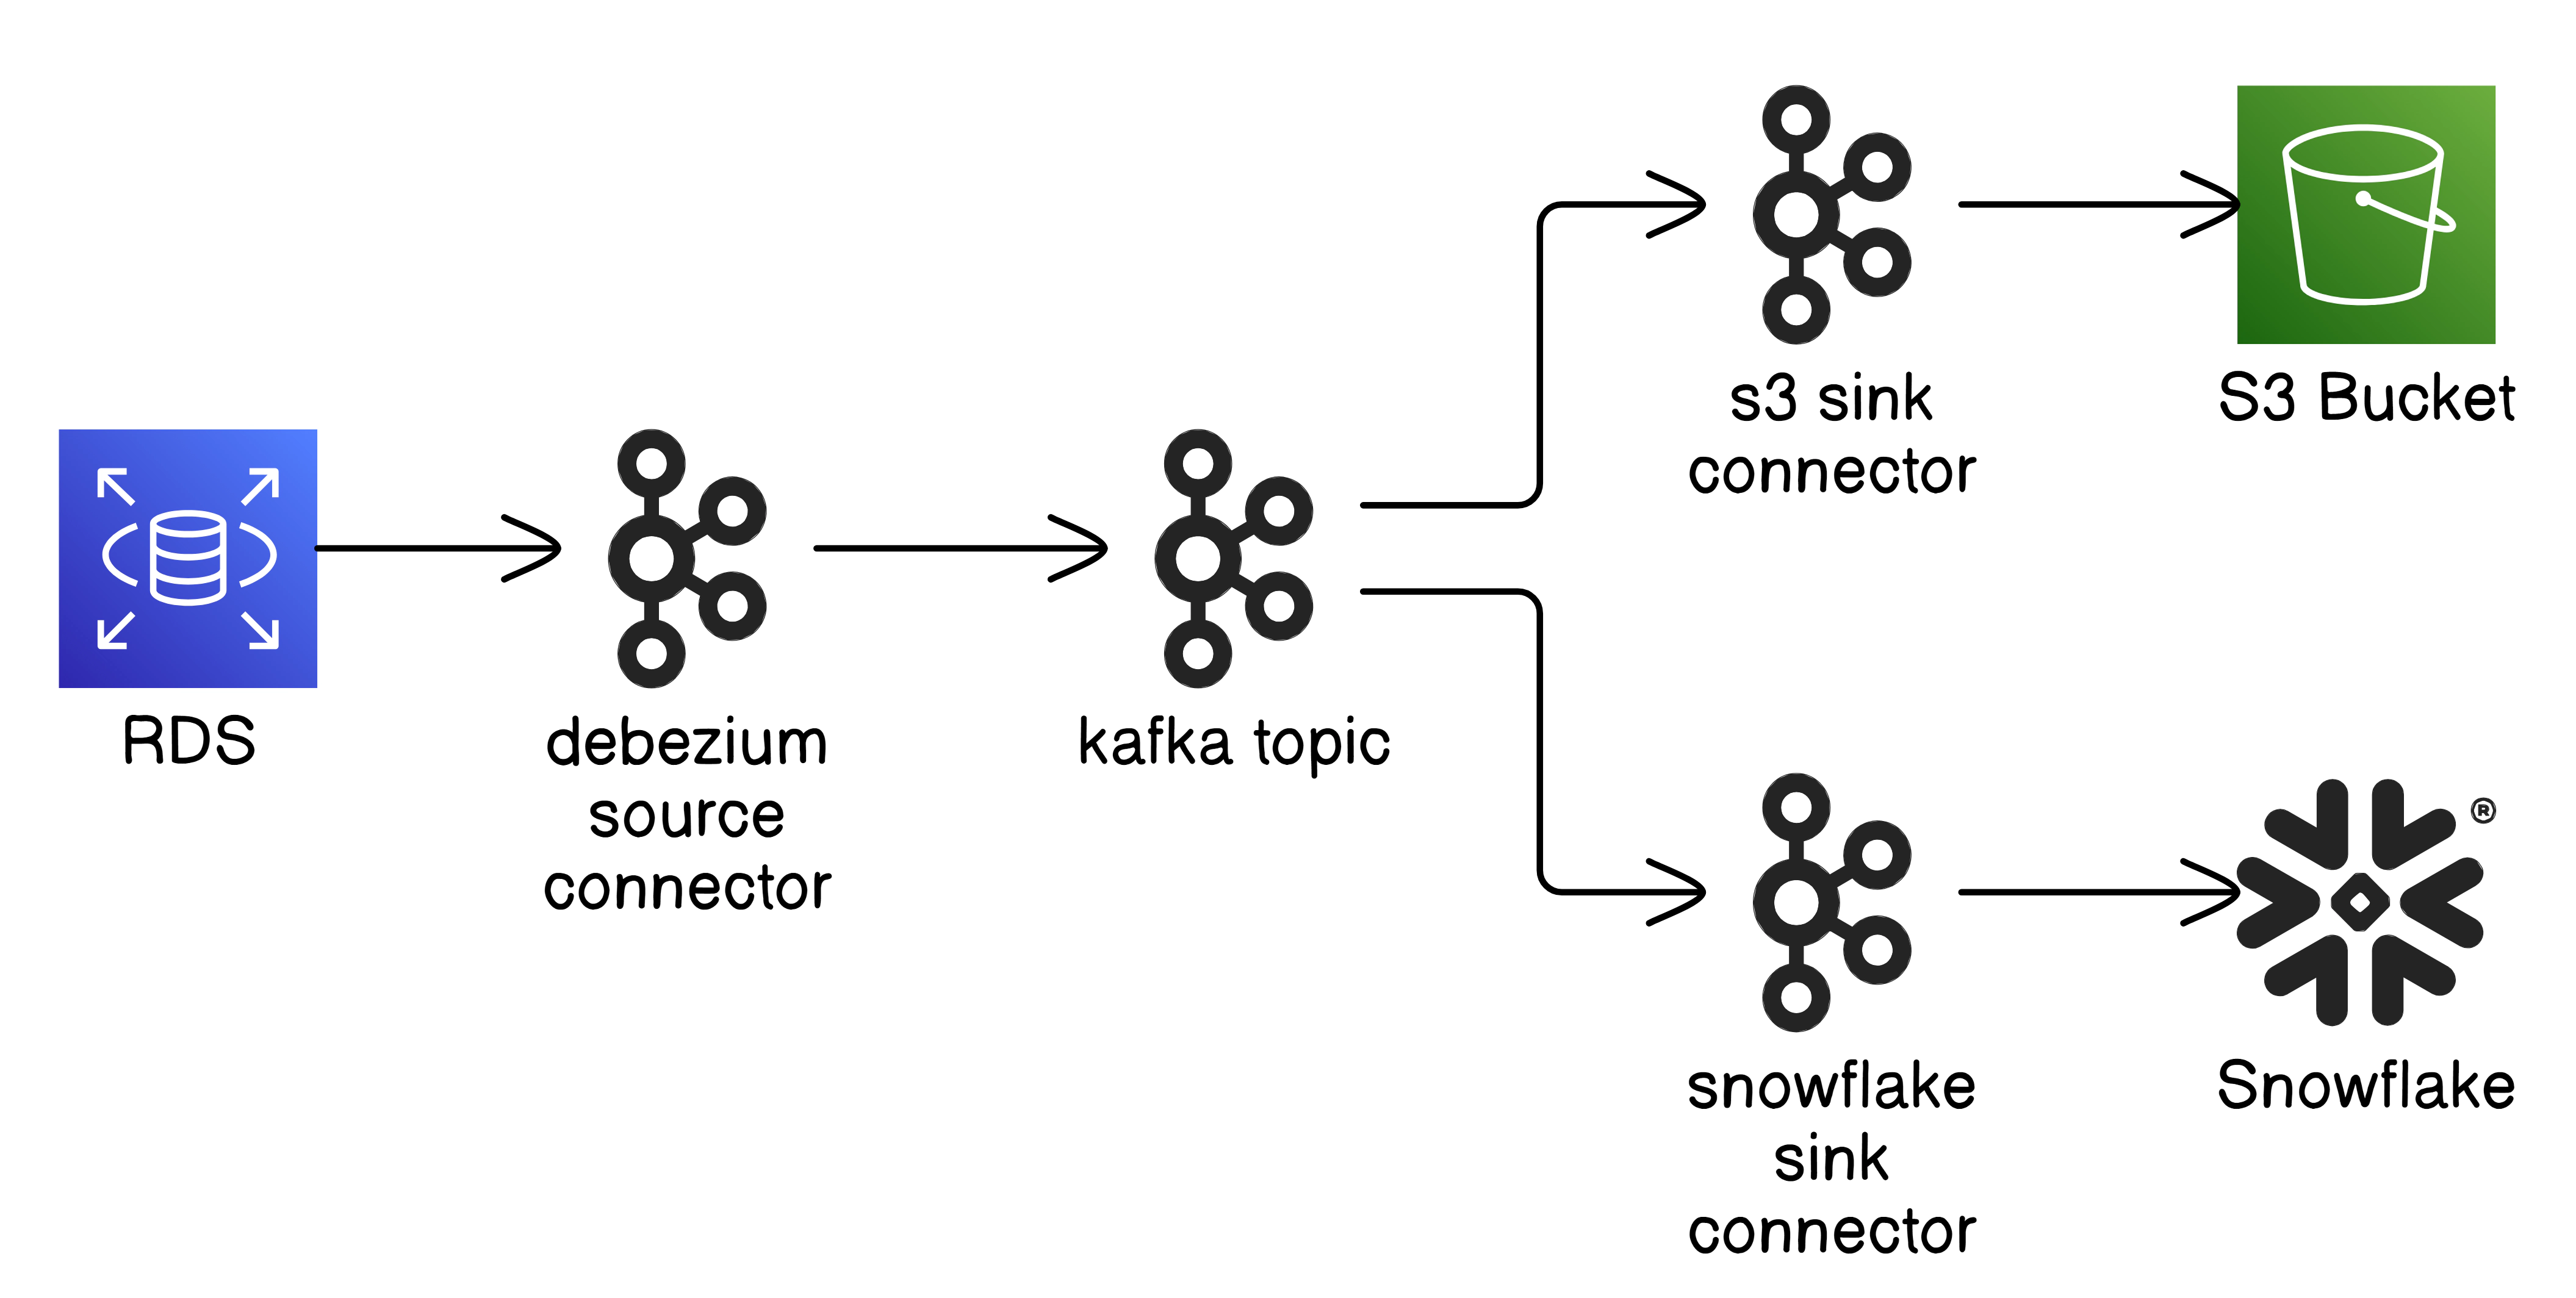
These commands are part of the Docker Compose setup, and by following the steps provided, you’ll ensure the connector is configured and executed at the appropriate time. You’ll need to create a snowflake-secrets.properties file by copying snowflake-secrets.properties.template, and update it with the Snowflake details for the Kafka user that was previously created in Snowflake. If you ever need to run the connectors manually, you can SSH into the Kafka Connect container and execute the following commands. You can review and adjust the connector configurations here
docker exec -it kafka-connect /bin/bash
cd /connect/config/source/mysql/
curl -X POST -H "Content-Type: application/json" --data @demo_db.config http://kafka-connect:8083/connectors
cd /connect/config/sink/snowflake/
curl -X POST -H "Content-Type: application/json" --data @shadowtraffic_customers.config http://kafka-connect:8083/connectors
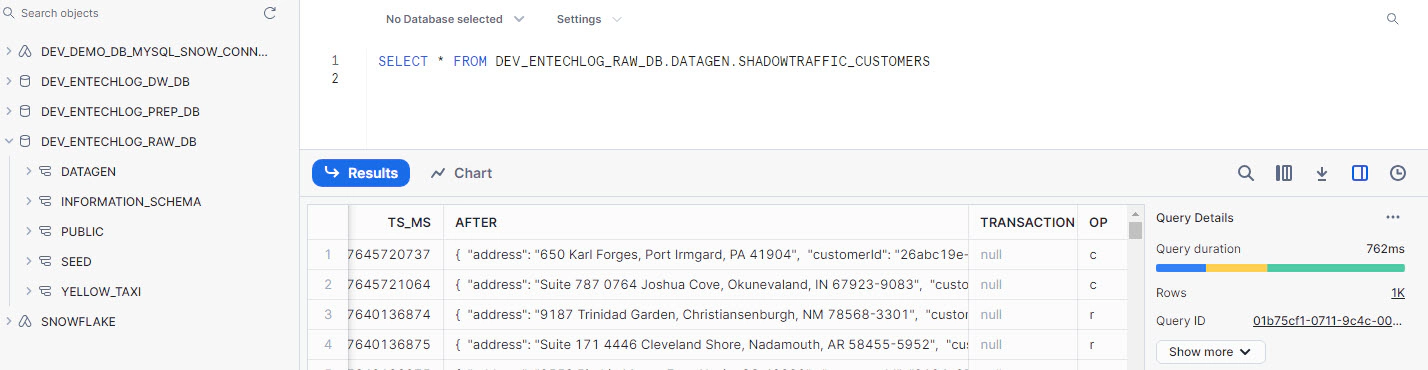
Once the connectors are running, you can log in to Snowflake and query the target table to see the stream of changes being replicated in real time.
AWS Database Migration Service (DMS) is a managed service that allows you to migrate databases to AWS quickly and securely. DMS can handle continuous data replication in near real-time and supports a wide variety of source and target databases, making it a versatile solution for replicating data. You can use DMS to migrate databases with minimal downtime, and it also supports ongoing replication to keep the source and target in sync.
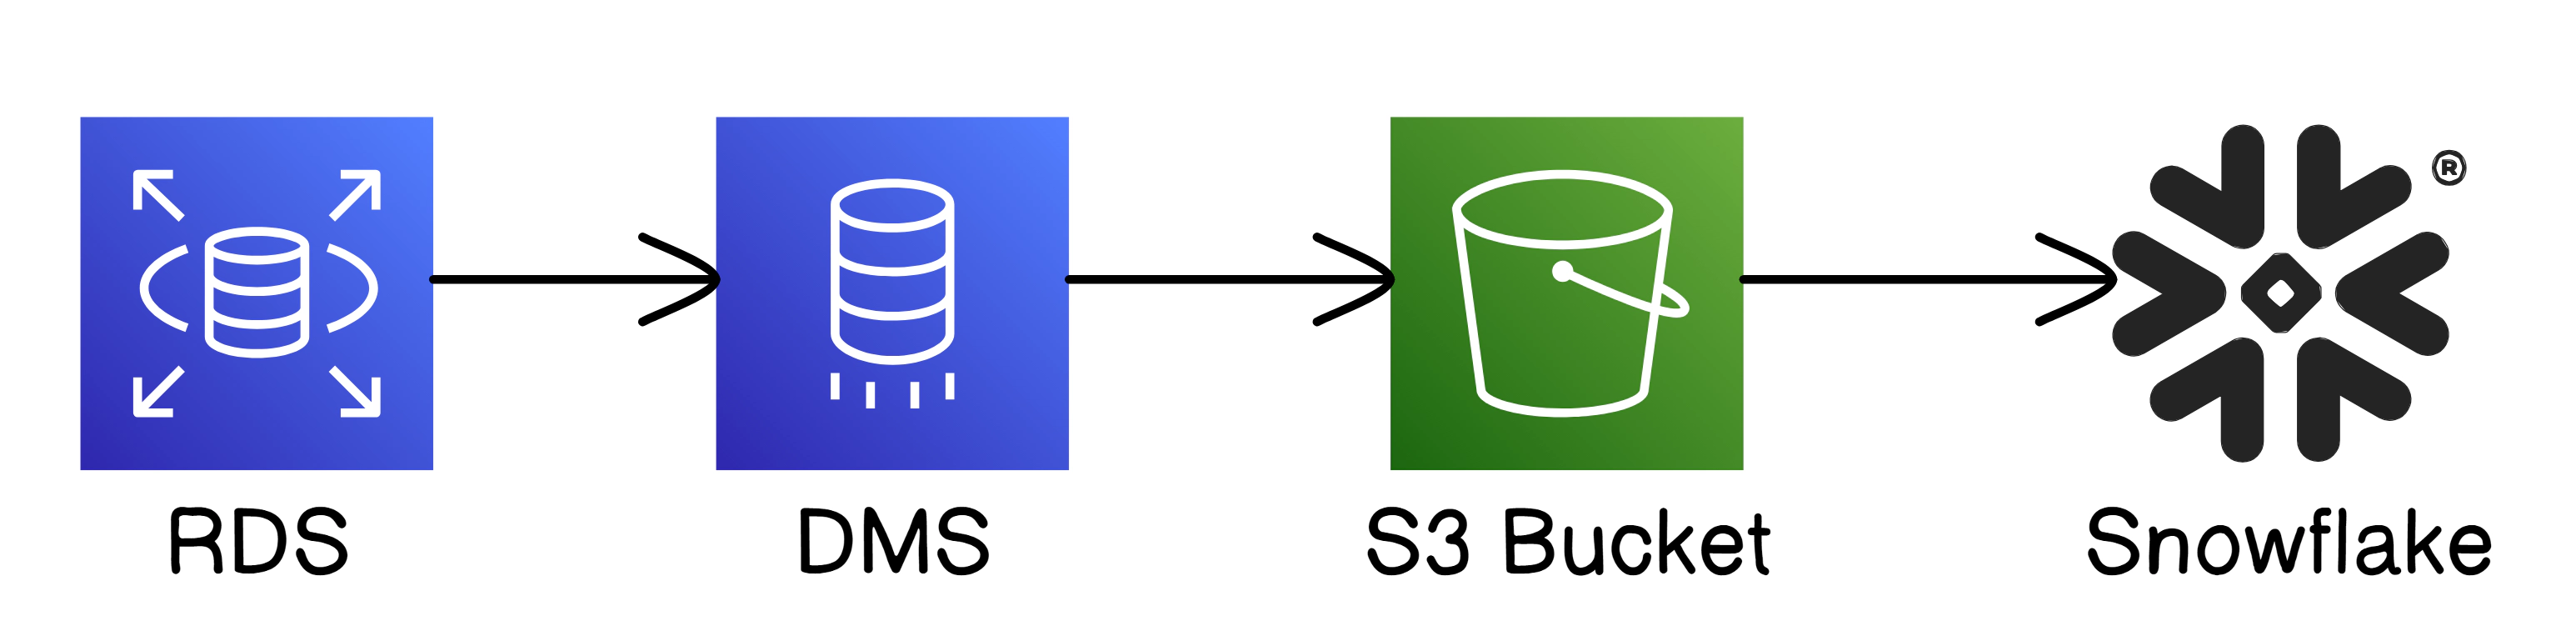
DMS offers two options
To set up DMS in this project, follow these instructions
The necessary Terraform code for setting up DMS is located in the terraform/archive directory.
Move the files aws_dms_common.tf and aws_dms_serverless.tf into the terraform directory to prepare them for execution.
mv terraform/archive/aws_dms_common.tf terraform/
mv terraform/archive/aws_dms_serverless.tf terraform/
Once the files are in place, apply the Terraform configuration to create the DMS tasks
Please run the following steps from the developer-tools container with Terraform, or from your Terraform environment.
terraform apply
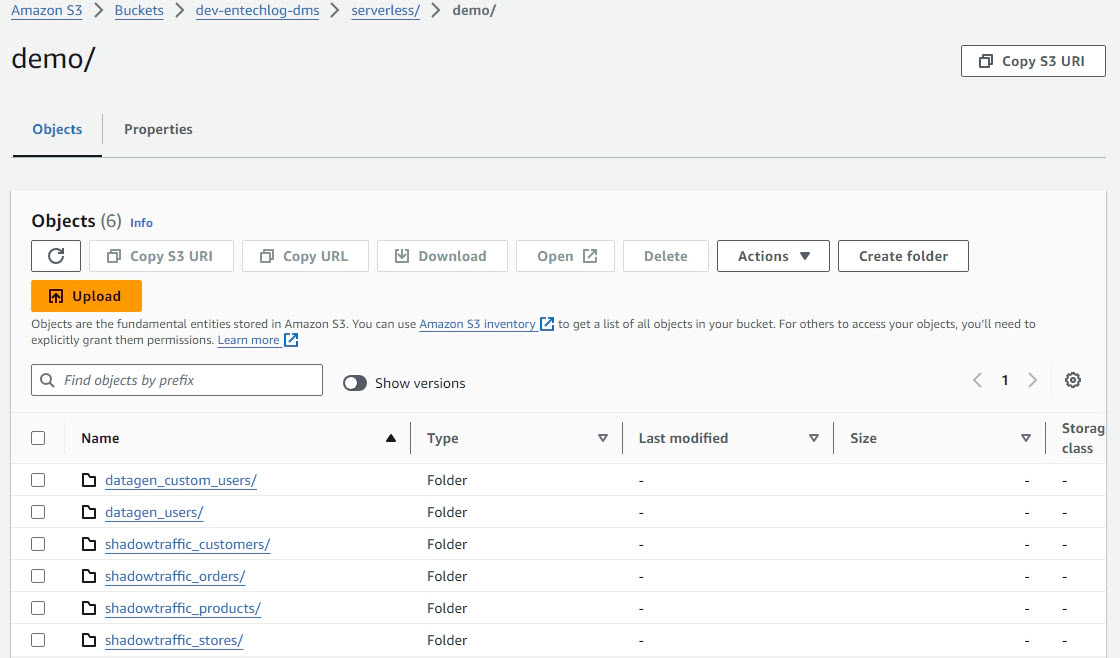
The creation of the DMS tasks and related resources may take around 30 minutes to complete. After the setup, DMS will handle continuous replication from the source RDS database to the target S3.
In this section, we’ll set up batch replication from an RDS MySQL source to S3 using SlingData. Sling provides a flexible way to replicate large batches of data between sources and targets without writing custom code.
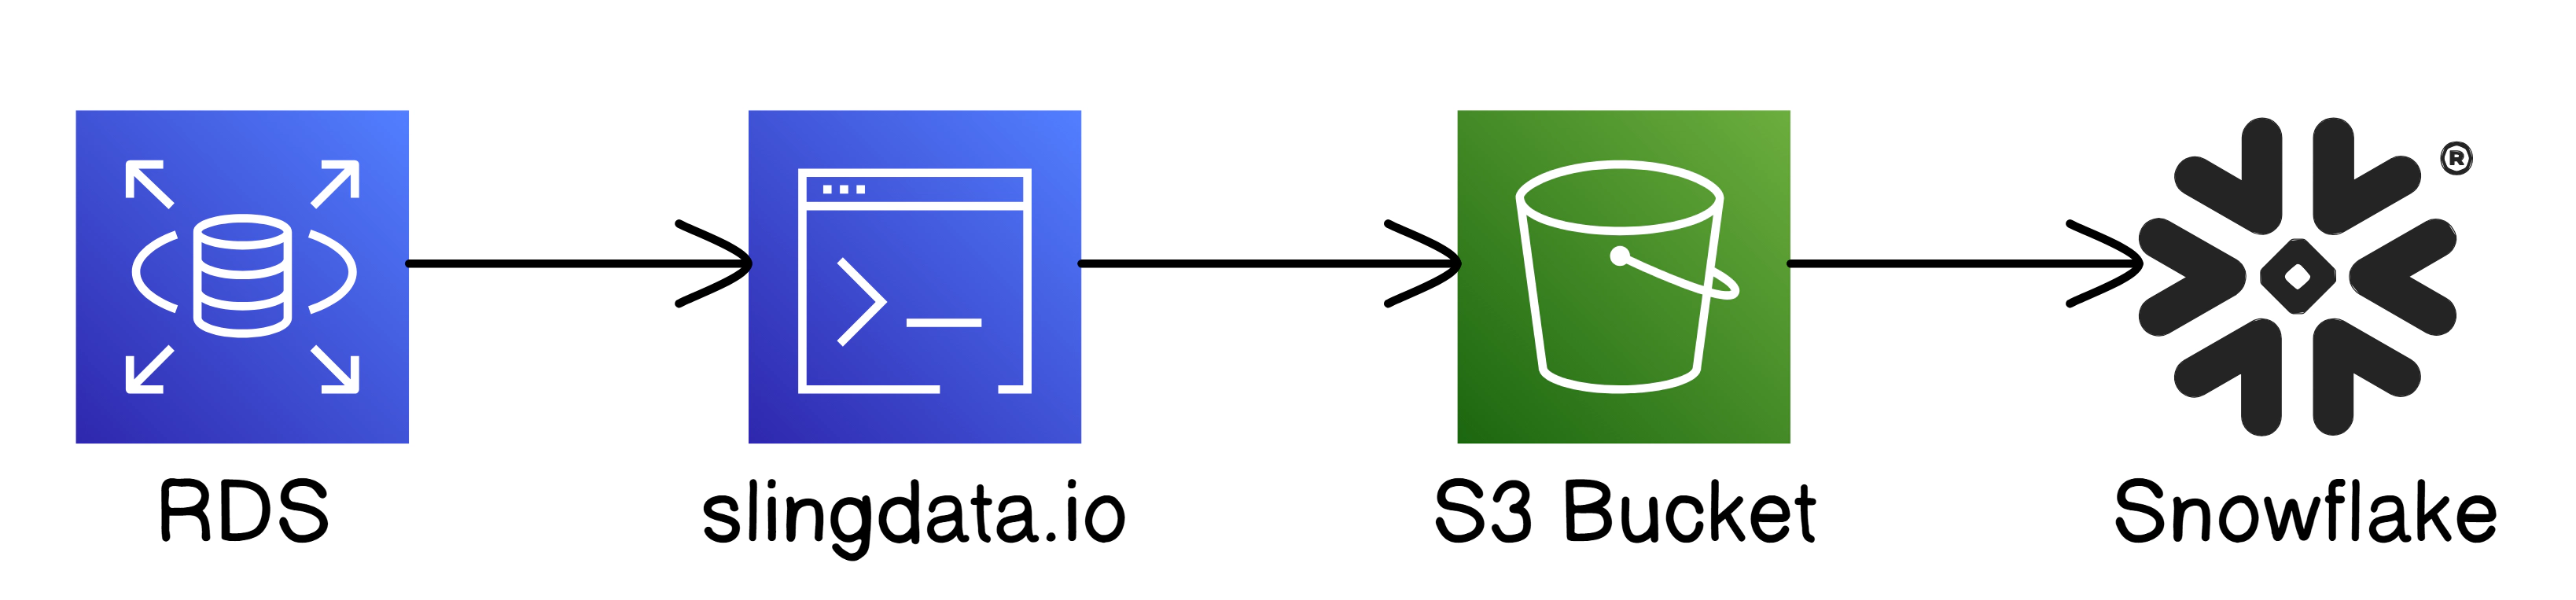
Navigate to the aws-dms/slingdata directory, create a copy of the .env.template file as .env, and update the RDS_MYSQL_SOURCE and S3_TARGET environment variables with your RDS connection string and S3 bucket information.
Navigate to the aws-dms/slingdata/replications/mysql_to_s3.yaml file and update the streams section with the list of objects (tables or schemas) that you want to replicate from the MySQL database to the S3 bucket.
Once the environment and replication streams are configured, run docker-compose up --build -d from the aws-dms/slingdata directory to start the SlingData container and initiate the batch replication process.

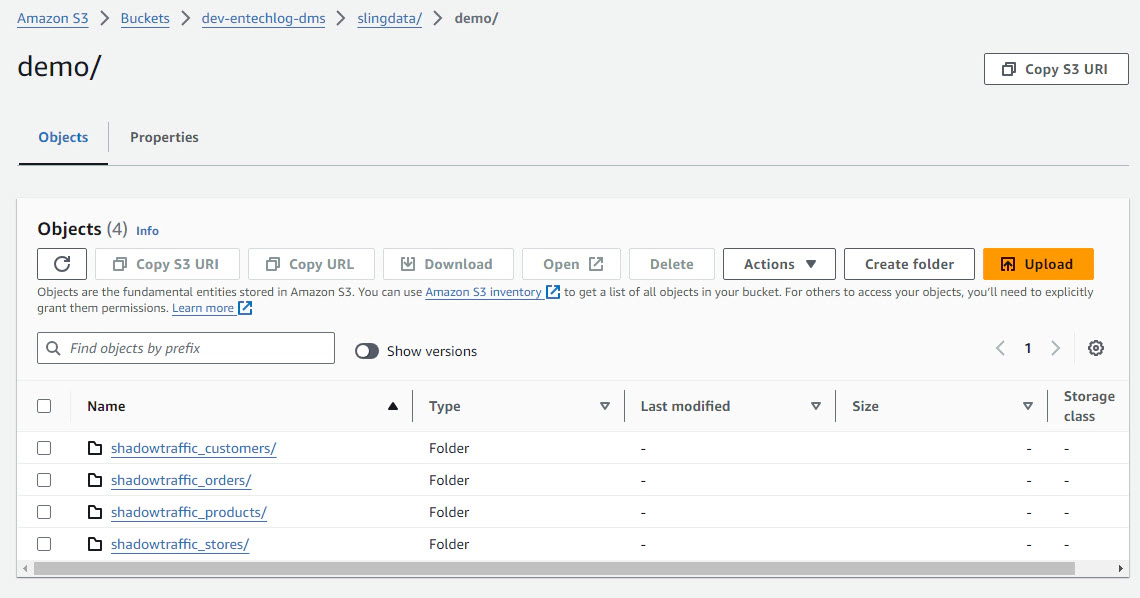
After the replication process finishes, you should see the data in S3. We used CSV exports in this example, but Sling also supports other file formats. One aspect not covered in detail here is how to load this data into Snowflake. Once the data is in S3, you can either stream it using Snowpipe or schedule regular COPY commands, depending on your ingestion requirements.
To automate the batch replication process, integrate this setup with a job scheduler of your choice (e.g., cron, AWS Lambda, or Prefect) to ensure the replication runs at defined intervals.
In this blog, we explored various ways to replicate data from Amazon RDS to S3 and Snowflake using no-code and low-code solutions like Kafka Connect, AWS DMS, and Slingdata.io. These approaches offer flexibility in automating data replication without the need for custom scripts.
I’m also exploring the Snowflake native connector, although I couldn’t finish it as most of the setup is currently done through the GUI. Additionally, I’m looking into another no-code tool called Ingestr, and I’ll provide updates once I’ve fully tested and integrated these solutions.
Hope this was helpful. Did I miss something ? Let me know in the comments.
This blog represents my own viewpoints and not those of my employer. All product names, logos, and brands are the property of their respective owners.
Overview Transferring data between Amazon S3 buckets is a common requirement for many AWS users. This guide will walk …

My journey into smart home automation began with Samsung SmartThings, which worked well initially. However, as Samsung …